此文是我还在学校[2016-06-27]那段时间写的文章, 当时记录在公众号中,由于长期没有继续维护,随搬迁至此博客.
前言 距离上次更新已经有一个多星期了,最近忙于找工作所以更新速度有所延迟,最近老是碰壁,但文章咱们还是要更新的。今天我们来讲讲Handler、Looper、MessageQueue三者的那些事,这是上篇,后面我会继续更新我对Handler的理解。Ok,下面进入今天正题。
💭什么是Handler?它有啥存在价值? A Handler allows you to send and process Message and Runnable objects associated with a thread’s MessageQueue. Each Handler instance is associated with a single thread and that thread’s message queue. When you create a new Handler, it is bound to the thread / message queue of the thread that is creating it – from that point on, it will deliver messages and runnables to that message queue and execute them as they come out of the message queue.
我把它概括为:handler是一套消息传递机制,我们可以通过通过它来发消息和接收消息
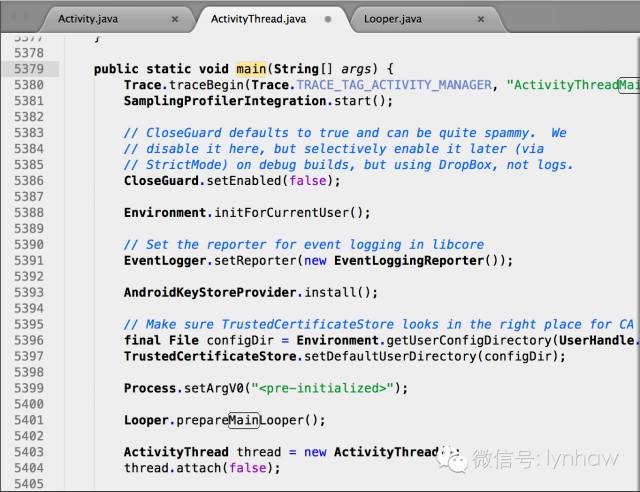
💭我们可以拿它做什么: There are two main uses for a Handler: (1) to schedule messages and runnables to be executed as some point in the future; and (2) to enqueue an action to be performed on a different thread than your own. 源码分析 每个应用程序都是通过ActivityThread创建的,而在这个线程中里面有个main方法
我们可以看到在main中有一个Looper.prepareMainLooper(),我们按住cmd+shift+R跳转过去看这个方法
1
2
3
4
5
6
7
8
9
public static void prepareMainLooper
prepare(false );
synchronized (Looper.class) {
if (sMainLooper != null) {
throw new IllegalStateException("The main Looper has already been prepared." );
}
sMainLooper = myLooper();
}
}
单击进入prepare方法
1
2
3
4
5
6
private static void prepare(boolean quitAllowed) {
if (sThreadLocal.get() != null) {
throw new RuntimeException("Only one Looper may be created per thread" );
}
sThreadLocal.set(new Looper(quitAllowed));
}
这里通过判断sThreadLocal.get()判断存储变量是否为空,默认是没有的,所以会调用sThreadLocal.set(new Looper(quitAllowed))创建一个Looper对象。 我们继续跟进Looper
1
2
3
4
private Looper(boolean quitAllowed) {
mQueue = new MessageQueue(quitAllowed);
mThread = Thread.currentThread();
}
可以看到在构造方法中创建了一个MessageQueue(我们称之为消息队列)我们创建了looper对象之后,会通过Looper.loop()去从消息队列中进行消息轮回。紧接着我们单击进入loop这个方法
1
2
3
4
5
6
7
8
9
10
11
12
13
14
15
16
17
18
19
20
21
22
23
24
25
26
27
28
29
30
31
32
33
34
35
36
37
38
39
40
public static void loop
final Looper me = myLooper();
if (me == null) {
throw new RuntimeException("No Looper; Looper.prepare() wasn't called on this thread." );
}
final MessageQueue queue = me.mQueue;
// Make sure the identity of this thread is that of the local process,
// and keep track of what that identity token actually is.
Binder.clearCallingIdentity();
final long ident = Binder.clearCallingIdentity();
for (;;) {
Message msg = queue.next(); // might block
if (msg == null) {
// No message indicates that the message queue is quitting.
return ;
}
// This must be in a local variable, in case a UI event sets the logger
Printer logging = me.mLogging;
if (logging != null) {
logging.println(">>>>> Dispatching to " + msg.target + " " +
msg.callback + ": " + msg.what);
}
msg.target.dispatchMessage(msg);
if (logging != null) {
logging.println("<<<<< Finished to " + msg.target + " " + msg.callback );
}
// Make sure that during the course of dispatching the
// identity of the thread wasn't corrupted.
final long newIdent = Binder.clearCallingIdentity();
if (ident != newIdent) {
Log.wtf(TAG, "Thread identity changed from 0x"
+ Long.toHexString(ident) + " to 0x"
+ Long.toHexString(newIdent) + " while dispatching to "
+ msg.target.getClass().getName() + " "
+ msg.callback + " what=" + msg.what);
}
msg.recycleUnchecked();
}
}
在上面代码第一句的位置我们看到有个myLooper方法,跟进进去我们看到它的返回值是从ThreadLocal存储的Looper实例
1
2
3
4
5
6
7
8
public static @Nullable Looper myLooper
return sThreadLocal.get();
}
private static void prepare(boolean quitAllowed) {
if (sThreadLocal.get() != null) {
throw new RuntimeException("Only one Looper may be created per thread" ); }
sThreadLocal.set(new Looper(quitAllowed));
}
final MessageQueue queue = me.mQueue;是拿到looper实例中的消息队列MessageQueue 源码上边已经贴出了
第三处高亮( for (;;)…)就是消息轮回最关键的部分,可以看到它其实就是一个死循环,并从消息队列中取出消息,如果为空的话就阻塞,不为空的话它会调用第四处高亮位置的代码 msg.target.dispatchMessage(msg)。这里的msg.target其实指的就是handler自己本身,我们使用handler去更新UI,通过sendEmptyMessage发送消息,然后重写handleMessage去回调,这里面底层就是通过msg.target.dispatchMessage去发送的。下面我们看看具体的涉及的源码
1
2
3
4
public final boolean sendMessage(Message msg)
{
return sendMessageDelayed(msg, 0);
}
1
2
3
4
5
6
7
public final boolean sendMessageDelayed(Message msg, long delayMillis)
{
if (delayMillis < 0) {
delayMillis = 0;
}
return sendMessageAtTime(msg, SystemClock.uptimeMillis() + delayMillis);
}
1
2
3
4
5
6
7
8
9
10
public boolean sendMessageAtTime(Message msg, long uptimeMillis) {
MessageQueue queue = mQueue;
if (queue == null) {
RuntimeException e = new RuntimeException(
this + " sendMessageAtTime() called with no mQueue" );
Log.w("Looper" , e.getMessage(), e);
return false ;
}
return enqueueMessage(queue, msg, uptimeMillis);
}
一直跳到sendMessageAtTime后拿到mQueue,进行放空判断,最后返回我们期待已久的enqueueMessage方法
1
2
3
4
5
6
7
private boolean enqueueMessage(MessageQueue queue, Message msg, long uptimeMillis) {
msg.target = this;
if (mAsynchronous) {
msg.setAsynchronous(true );
}
return queue.enqueueMessage(msg, uptimeMillis);
}
msg.target = this;这句代码就是把当前的handler赋值给msg的目标地址,最终调用queue.enqueueMessage将消息发送给handler自己,最终保存到消息队列中去。
我们回过来看看dispatchMessage
1
2
3
4
5
6
7
8
9
10
11
12
public void dispatchMessage(Message msg) {
if (msg.callback != null) {
handleCallback(msg);
} else {
if (mCallback != null) {
if (mCallback.handleMessage(msg)) {
return ;
}
}
handleMessage(msg);
}
}
这也就是为什么我们要重写handleMessage这个方法的原因 ,因为msg.target.dispatchMessage(msg)是最终调用的方法,而msg的值是什么?就是我们之前在enqueueMessage消息队列中储存的信息~
感谢您的阅读,本文由
lynhao 原创提供。如若转载,请注明出处:lynhao(
http://www.lynhao.cn )